A beginner’s guide to WordPress (part 1)

In this first of a two-part article, we share 10 top tips for beginners who run a WordPress website. It’s not intended for developers, but rather those who run their own business or are in the marketing team of a business, and who have made the sensible decision to have a WordPress-based website.
There are three variations of a WordPress website – 1) A custom design and build by a developer using the WordPress framework as a means to give you a CMS (admin area); 2) An installation of a bought WordPress theme from somewhere like Theme Forest; and 3) A default installation of WordPress using one of its native themes. All the tips in this article are relevant to all three installation types.
So, let’s get started:
1. Do the WordPress and plugins updates when it says.
There are a few ‘musts’ when owning a website and this is one of them. Not keeping the site updated is the most common cause of any website getting hacked because it becomes victim to a vulnerability in an old bit of code. The same goes for the plugins. As these are often created by lots of different developers in the WordPress community, there will be a mix of how often those developers release an update of their plugin to keep it up to date with the current version of WordPress. Very often, the plugin is the part of a website that gets the hackers in because they know the plugin developer hasn’t updated it for a while (the last updated date is visible on the WordPress Plugin website so it’s easy to work out which plugins may be more vulnerable than others).
Things to be aware of:
a) You may need to ask your developer to do it, depending on the hosting or security set up of your site.
b) You may need to locate the FTP address, username and password in order to complete the update if they have not been saved in the WP-Admin.
c) Do a backup beforehand.
Top tip:
If the backup completes, but the site won’t load and displays the maintenance mode message, you will need to log in to the host space via FTP and locate the file ‘maintenance.php’ in the website root. Sometimes WordPress creates that file when updating, but doesn’t get rid of it when completed. You can just delete this file if that happens and the site will come back.
2. Caching plugin
The speed of a website is an important aspect and directly contributes to your user’s experience – and so will have a clear effect on the number of sales or enquiries you’ll receive. Slow websites annoy users and if it annoys users and they leave, Google will get the impression that your website isn’t liked. That will have a negative effect on your search engine position, too.
One thing you can do, particularly if it’s a site with lots of product pages, or pages with lots of content, is to install a caching plugin. When a website loads in a user’s browser it calls the website’s host server to deliver all the content for the page. If that takes a long time, you run the risk of low usage. A caching engine works by taking a snapshot of each page which it can deliver quickly, rather than querying the site’s database and delivering the page on the fly. Quicker page delivery – happy user. Happy user – happy Google.
Things to be aware of:
A plugin engine will take snapshots of the pages of your site – which is great– but if you edit and change the content regularly (eg. prices, course or event information etc.) you need to make sure you purge the cache for those pages or the older page may be served up.
Top tip:
The caching plugin we recommend for its simplicity is W3C Total Cache. It takes a bit of set up, but comes with good set-up instructions.
3. Wordfence or iThemes Security
Security is vital with all websites. WordPress websites, like all other frameworks, such as Drupal, Joomla, Type3 or Magento, suffer from hack attempts, usually through a brute force attack. That’s a hacker’s script that finds the wp-admin URL of your website and fires a script at it over and over trying to guess the logins. Good, long passwords are a must and WordPress will make you set a long one, but installing a plugin that repels and blocks a hacker’s IP address if they launch a brute force attack on your site gives you peace of mind that unauthorised access will be very hard. Often, the brute force hack is automated and hackers often give up after a few failed attempts and move on, especially if their IP address is being blocked.
Things to be aware of:
You need to set your plugin up right. Both Wordfence and iThemese Security come with excellent instructions, so take the time and follow the set-up process. As the plugins prevent access to the admin area based on the number of failed attempts, make sure you don’t block yourself with a failed login or you’ll need to delete the plugin via the host space just to get back in to your WP admin.
Things to be aware of:
a) You can download plugins from here: iThemes Security and Wordfence. Make sure you note down your WP admins login somewhere – BUT NOT ON YOUR COMPUTER!
b) iThemes Security will let you set a different URL for your WP Admin instead of www.yourdomain.com/wp-admin – so you can set it to something like www.yourdomain.com/backoffice (or something that you can remember but isn’t the default URL that a bot could find).
4. Enable friendly URLs (permalinks)
This is an easy one to do, but all-too often forgotten about. From both the marketing point of view and the user’s experience, making sure the URL is short and legible are a website owner’s 101. WordPress calls them ‘permalinks’. Additionally, it’ll look better when you share page URLs on your social media channels. The Google Search Console will most likely prompt you to sort out the URLs at some point, too.
As an example, this is good: https://www.aubergine262.com/search-engine-optimisation
But this isn’t: https://www.aubergine262.com/?p=18
Things to be aware of:
Changing URLs on a website can cause pages to disappear (or rather, not be available on a URL that you were using), so it will also mean that you will need to start managing your URLs better using the Google Search Console.
Top tip:
Here’s how to do it.
- Log in to your WP Admin.
- Select from the left menu item ‘Settings’ and then ‘Permalinks’.
- Select ‘custom structure’ from the radio button list (the last one). The corresponding URL should be set as ‘https://www.yourdomain.com /%postname%’.
- Click the blue ‘save’ button.
- Open the website in a new browser and reload your website (you may need to press CTRL & F5 to make sure you get a fresh version of the site) – then check the address bar. As you navigate around, the URLs will start to reflect the names of the pages.
- You may now need to start to think about those page titles a little more – which you can do by editing the page permalink located at the top of the page near the page title.
Note: Remember – no spaces (words need to be separate by hyphens), no special characters (except a hyphen) or capital letters.
As an example, if you had a page with the title ‘About my Business’ it needs to follow this sort of format: https://www.yourdomain.com/about-my-business
5. Turn ‘comments’ off
Unless you have a WordPress blog site where you post articles with the expectation of the public (or registered users) making comments in response to your articles, there’s absolutely no reason or need to have the comments feature enabled. If you have a WordPress site already and haven’t disabled the comments feature you’ll be aware of the ever-increasing number of comments accumulating in the ‘comments’ tab in the WP-Admin, awaiting mediation. You may also have it set so that you get an email every time a comment is made. In almost every case, they will be spam. A lot of offers of cheap designer handbags and shady pharmaceuticals.
Things to be aware of:
If your WordPpress website is one you built or bought with a pre-designed theme (from Theme Forest and similar) then your site may be pre-configured to have the posts displayed on certain pages already. If your site was created by a competent website developer then it’s most likely this will already have been done. You may have pages or templates in your site that have the comment entry box at the bottom of the page that hasn’t been removed. You’ll need to get a web developer to cut that out of the code as it’s not possible to do this from the WP Admin.
Top tips:
Here’s how to do it:
1) Log into your website WordPress WP Admin
2) Select from the left menu ‘Settings’ and then ‘Discussion’
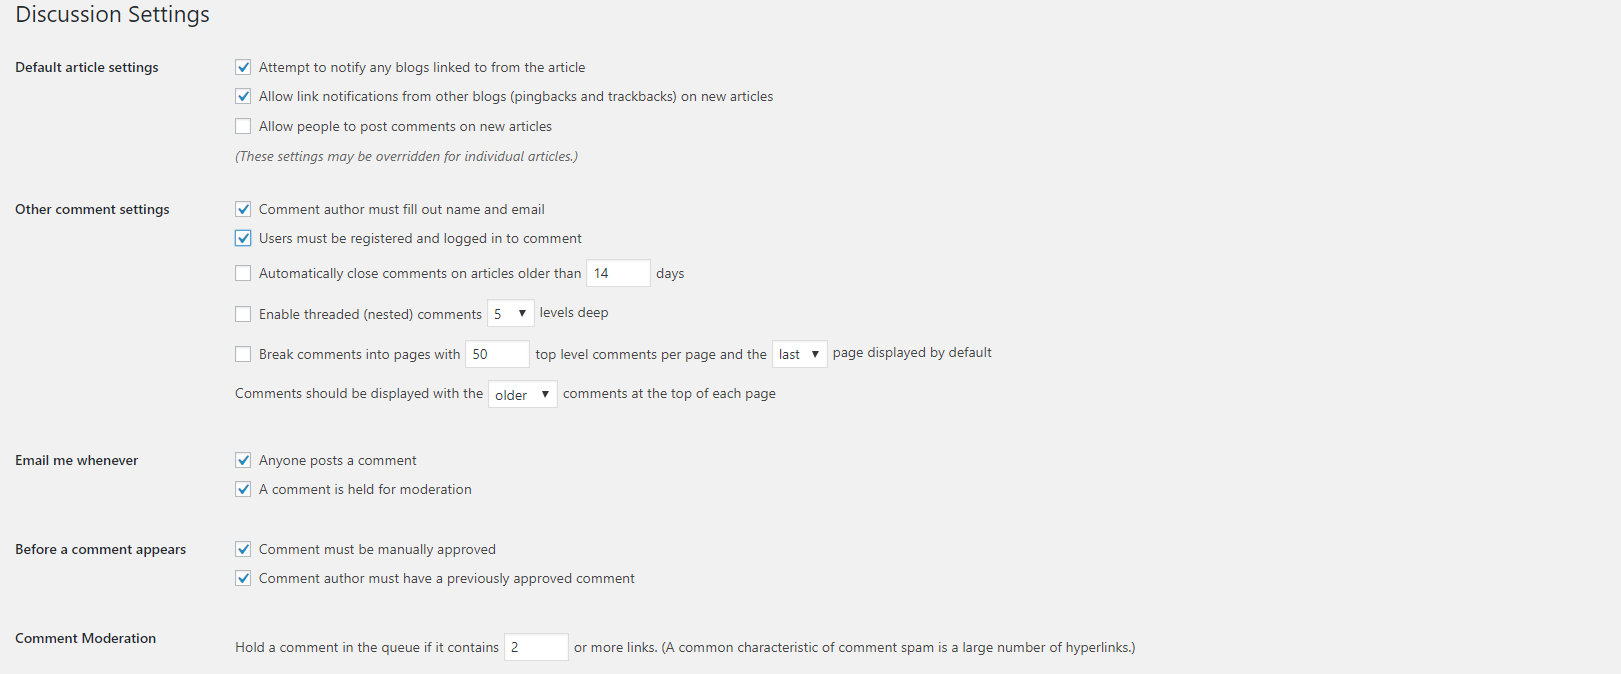
3) The next page will provide a list of check boxes. We recommend you set the checkboxes as the following – but remember you must untick the third checkbox: ‘Allow people to post comments on new articles’:
Look back next month for our follow-up article, where we’ll provide five more top tips for beginners who run a WordPress website.